Building a Homelab, Part II
Netboot with iPXE and MikroTik
Posted on 2024-03-25
This is the second in series of posts about building my homelab. In the previous post, I elaborated on hardware that went into the build, and the assembly process itself.
Here I’ll describe how servers in my homelab boot over network using PXE, iPXE and my MikroTik router.
Why Network Boot?
One practical benefit of booting over network is that physical media, such as Live CD/DVD, bootable thumb drive, or even hard drive, is not needed to boot an operating system. To make an image available for booting to all computers on local network one simply needs to upload it to the boot server. This makes it easy to maintain a big library of different images available for booting, and to add, update or remove these images on the fly. Imagine having a USB drive stacked with different OS images, diagnostics, recovery and repair tools that you don’t have to carry around and physically insert in each host you want to boot.
As we’ll see later on, network boot allows for a great degree of configuration. Popular network bootloaders are quite robust, and have feature parity with traditional disk-based bootloaders like GRUB. You can display a boot menu with multiple boot options and preset timeout. There’s a powerful command line interface. You can define a boot chain, such that if an image fails to boot, the next option in chain is attempted. You can decide what image a host will boot based on parameters such as hostname or MAC address. And the list goes on.
Because of the above, network boot is the most prevalent boot method in datacenters.
Here’s another perspective: being able to control which machine boots what image shines the most when you use a declarative operating system like NixOS. Reconfiguring a single host, a subset, or the entirety of your fleet becomes as easy as changing which image the machines boot from, and then simply rebooting them to pick up the changes.
How PXE Works
The goal of PXE is to download and execute
- BIOS hands off control to network card (NIC) firmware, which implements PXE API. This includes a minimal IP stack, a DHCP client and a TFTP client.
- The NIC constructs a
DHCPDISCOVERmessage that contains its client ID (MAC address). This message is encapsulated in a single UDP/IP packet destined to broadcast address of255.255.255.255and destination port 67 at L3, and to broadcast MAC address offf:ff:ff:ff:ffat L2 level. Vendor class identifier (option 604) in theDHCPDISCOVERmessage is set toPXEClient:ARCH:xxxxxx:UNDI:yyyzzz, to indicate that the client is PXE-enabled. Parameter request list (option 55) inDHCPDISCOVERmessage contains a list of requested configuration parameters from the DHCP server. The NIC adds two PXE-specific parameters to the parameter request list: TFTP server name, which corresponds to DHCP option 66, and bootfile name, option 67. - All devices on the local network segment receive this packet, but only DHCP servers act on it. For simplicity, I’ll assume there’s only one DHCP server on this broadcast domain. The server responds with a
DHCPOFFERmessage destined to MAC address specified in the discover message. Just like any DHCP offer, this message contains configuration parameters requested byDHCPDISCOVER. These usually include: one available IP address that has been reserved by the server for the client, lease time, network netmask, address of the default gateway, and a list of DNS servers. The server also populates values for PXE-related DHCP options that the NIC requested:next-server(option 66), which is an IP address of the TFTP server, andboot-file(option 67), which is filename of the NBP assembly to download.DHCPOFFERis then broadcast on L2 and L3, with destination port set to 68. - The rest of DHCP dance plays out:
- The NIC receives
DHCPOFFERbroadcast from the server, and requests the offered parameters by broadcasting aDHCPREQUESTmessage.DHCPREQUESTmessage contains requested IP from the offer, and the IP of the DHCP server that made the offer. Aside from that, it’s almost identical to theDHCPDISCOVERmessage. - The server then issues a lease, and broadcasts a
DHCPACKmessage, which the NIC picks up.DHCPACKcontains the same requested configuration parameters asDHCPOFFER. - The NIC then updates its network configuration in accordance with offered configuration parameters.
- The NIC receives
- The NIC then downloads the
boot-fileNBP assembly from thenext-servervia TFTP. - Once the NBP is downloaded and loaded into memory, the control of the boot process is finally handed over to the program.
At this point of the PXE boot process, NBP offers a more versatile bootloader environment, capable of loading and starting an operating system. PXELinux is one such NBP, specifically used to load Linux. A more robust, modern and quite popular NBP is iPXE, which I will use here.
How iPXE Works
iPXE can be obtained either as a firmware binary, in which case it’s supposed to be flashed on the NIC to replace factory PXE firmware, or NBP binary. The first approach is faster to boot, due to skipping the initial PXE exchange described above, because iPXE runs straight from the NIC. The drawback is that it requires physical access to the card, and is time consuming, especially for many machines and/or NICs. In addition, whenever iPXE needs to be updated to a newer version, another round of flashing needs to be done. On the other hand, using PXE to chainload – download and execute – iPXE as NBP, as described in the previous section, is a more flexible approach.
When iPXE loads, it runs a script file. This is similar to how GRUB is configured through a GRUB config file. There are two ways to provide iPXE with a script: either “bake” it in NBP iPXE binary, or download it over network. Again, the former option reduces overall boot time due to not needing to fetch the script after iPXE starts, but is also less flexible. As I don’t particularly care about shaving seconds off boot time, I use the latter method.
As soon as iPXE starts running, a fresh PXE boot procedure is kicked off with the goal of fetching iPXE script, with one important modification: a few iPXE-specific options5 are added to DHCPDISCOVER and DHCPREQUEST, most importantly user-class option (option 776). Because of option 77, DHCP server will be able to tell that iPXE is running on the other side, and will therefore set boot-file (option 67) to point to iPXE script instead of NBP assembly in DHCPOFFER and DHCPACK messages. Upon receiving DHCPACK, iPXE will download the script file over TFTP and then interpret it.
The rest of the process depends on what’s in the script, really. To get the feeling of how expressive iPXE scripting is, you can take a look at this amazing gist by Robin Smidsrød.
To keep things simple here, I’ll use a very plain, boring script to boot NixOS in-memory:
#!ipxe
set initscript /nix/store/2ll6swqhsg0mpby6kbffz2s8hqar40zr-nixos-system-nixos-23.11beta-420383.gfedcba/init
kernel bzImage init=${initscript} initrd=initrd nohibernate loglevel=4
initrd initrd
boot
I’ll cover how to build customized, netbootable NixOS images for each host in another blog post. For now, I built a barebones, minimal version of NixOS that can boot over network by following section on PXE boot of the Nix manual.
Now let’s make a quick detour and go over MikroTik configuration that sets up the server end of PXE + iPXE boot process described above.
Setting Up PXE + iPXE Boot On a MikroTik Device
A couple of starting points and assumptions:
- I’ll be using MikroTik hAP ax3 for this, but you can use any MikroTik device with RouterOS 7.4 or later. At the very least, your device should be able to provide DHCP server and TFTP capabilities
- I will setup a PXE-enabled DHCP server that will issue leases to devices on
homelab-bridgeinterface - Devices on
homelab-bridgewill be assigned IP addresses in10.1.100.0/24range - Address of MikroTik device is
10.1.100.1onhomelab-bridge - NBPs will be hosted on MikroTik. Therefore,
next-serverDHCP option will point to MikroTik - I want to support PXE boot for both legacy BIOS clients and modern UEFI clients
Note: I suggest getting a USB 3.0+ stick for storing NBPs and OS images, as the latter can be quite large. MikroTik devices usually do not have big internal storage. I’ll assume that USB drive is attached to the device, and has a single
ext4partition which is mounted at/usb1-part1. If you’re only going to be serving NBPs from your MikroTik and plan to use a separate server to host OS images, MikroTik’s internal storage will probably suffice.
The first thing to do is download iPXE NBP binary and upload it to MikroTik device. Because I want to support both legacy BIOS clients and modern clients with UEFI boot, I’m going to need two different iPXE binaries: undionly.kpxe for BIOS clients, and snponly.efi for UEFI clients7. You can drop them onto the router via Winbox or Web UI, or you can scp them over. Let’s also upload the script from above as nixos.ipxe, and initial ramdisk and compressed kernel image of our custom NixOS:
/file
print terse proplist=name,type,size
# 0 name=usb1-part1 type=disk
# 1 name=usb1-part1/lost+found type=directory
# 2 name=usb1-part1/pxe/undionly.kpxe type=.kpxe file size=67.4KiB
# 3 name=usb1-part1/pxe/snponly.efi type=.efi file size=196.0KiB
# 4 name=usb1-part1/ipxe/nixos.ipxe type=.ipxe file size=205
# 5 name=usb1-part1/nixos/bzImage type=file size=8.5MiB
# 6 name=usb1-part1/nixos/initrd type=file size=402.7MiB
Let’s create TFTP server entries for these as well. The following map requested TFTP file name to file path on the device:
/ip tftp
add real-filename=/usb1-part1/pxe/undionly.kpxe req-filename=undionly.kpxe
add real-filename=/usb1-part1/pxe/snponly.efi req-filename=snponly.efi
add real-filename=/usb1-part1/ipxe/nixos.ipxe req-filename=nixos.ipxe
add real-filename=/usb1-part1/nixos/bzImage req-filename=bzImage
add real-filename=/usb1-part1/nixos/initrd req-filename=initrd
Next, I’m going to set up DHCP server options for boot-file (option 67), that will be used to point at NBPs and the iPXE script, and next-server, which should instruct clients to download NBPs from MikroTik:
/ip dhcp-server option
add name=boot-file-pxe-uefi code=67 value="s'snponly.efi'"
add name=boot-file-pxe-bios code=67 value="s'undionly.kpxe'"
add name=boot-file-ipxe-nixos code=67 value="s'nixos.ipxe'"
add name=next-server code=66 value="s'10.1.100.1'"
I can combine these options with option sets to apply multiple options simultaneously:
/ip dhcp-server option sets
add name=boot-pxe-uefi options=boot-file-pxe-uefi,next-server
add name=boot-pxe-bios options=boot-file-pxe-bios,next-server
add name=boot-ipxe-nixos options=boot-file-ipxe-nixos,next-server
These three option sets give different instructions to DHCP clients:
boot-pxe-uefiinstructs UEFI clients to download UEFI iPXE NBP from MikroTikbooy-pxe-biosinstructs BIOS/legacy clients to download BIOS iPXE NBP from MikroTikboot-ipxe-nixosinstruct clients running iPXE to download iPXE script from MikroTik
I’ll talk about how to decide which option set to use in a minute. But first let’s set up an address pool, a DHCP server network and a DHCP server for homelab-bridge:
# IP pool defines a range of addresses.
/ip pool
add name=pool-homelab ranges=10.1.100.2-10.1.100.254

# DHCP network "groups" DHCP configuration parameters.
# Which DHCP network applies is decided by matching leased
# IP address against DHCP network address.
# Attach boot-pxe-uefi option set to this DHCP network.
/ip dhcp-server network
add address=10.1.100.0/24 gateway=10.1.100.1 dns-server=10.1.100.1 \
  domain=homelab dhcp-option-set=boot-pxe-uefi

# Finally, a DHCP server leases IP addresses from an IP address
# pool.
/ip dhcp-server
add name=dhcp-homelab interface=bridge-homelab address-pool=pool-homelab
You might be wondering how the DHCP server knows which option set should be provided to a DHCP client. Awesome folks at MikroTik added support for generic matchers recently. Matchers can inspect specific DHCP option value, and alter the option set used for that specific client if there’s a match. Client system architecture DHCP option8 (option 93) set by DHCP clients can be used to figure this out:
# If option 93 is 0, MikroTik is talking to a legacy/BIOS client.
/ip dhcp-server matcher
add name=if-client-arch-is-legacy-then-boot-bios server=dhcp-homelab \
  address-pool=pool-homelab option-set=boot-pxe-bios code=93 value="0x0"
In addition to that matcher, I need another matcher to check user class DHCP option (77, as described above), and set boot-file to the iPXE script:
# If option 77 is "iPXE", MikroTik is talking to a client running iPXE.
# Provide iPXE script instead of NBP.
/ip dhcp-server matcher
add name=if-user-class-is-ipxe-then-boot-ipxe server=dhcp-homelab \
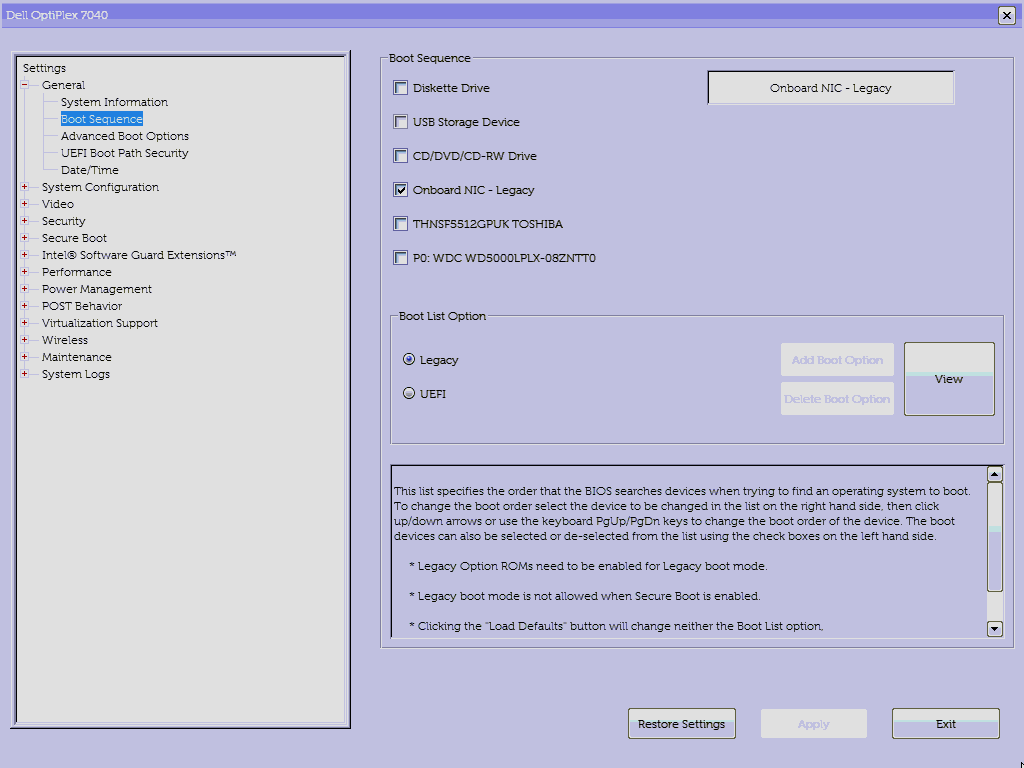
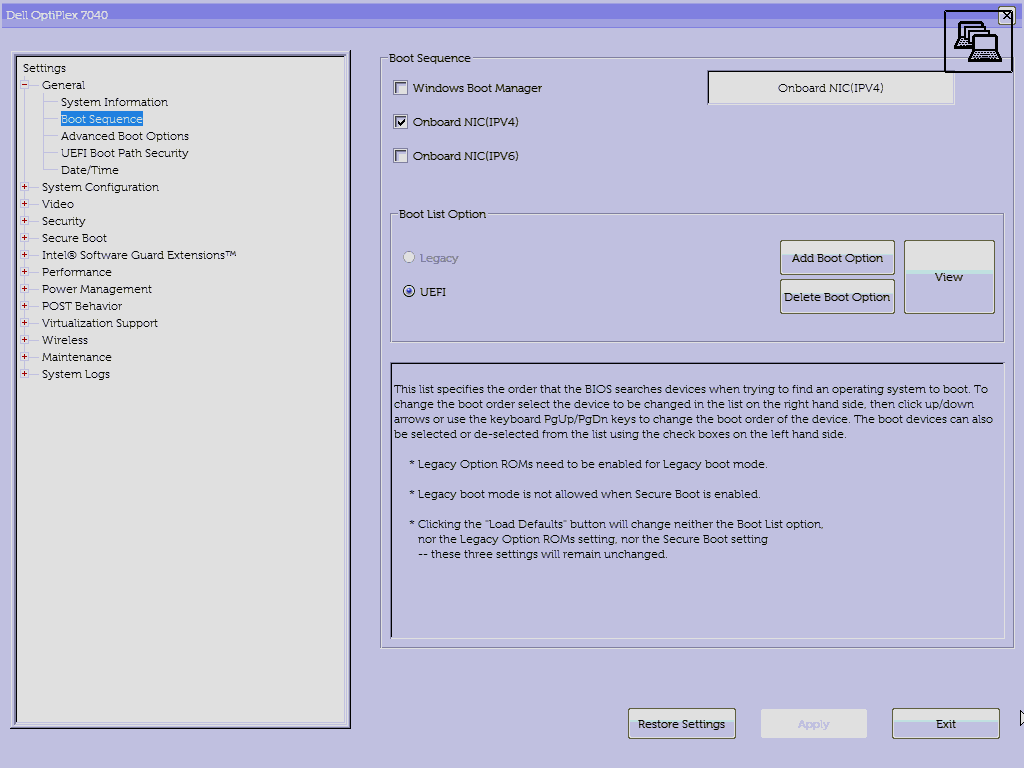
address-pool=pool-homelab option-set=boot-ipxe-nixos code=77 value="s'iPXE'"The only thing that’s left to do is to configure my servers to PXE boot. This is quite easy to do with MeshCommander and remote desktop. I booted into BIOS on each computer and configured 2 of them to PXE-boot in legacy mode, and the other 2 to PXE-boot in UEFI mode.
Will It Boot?
Time to check if this works! Before you give it a go, you might want to enable DHCP debug logging – it’s quite useful to see which DHCP messages are being received and sent, and what DHCP options are being set9.
# Temporarily enable DHCP logging.
/system logging
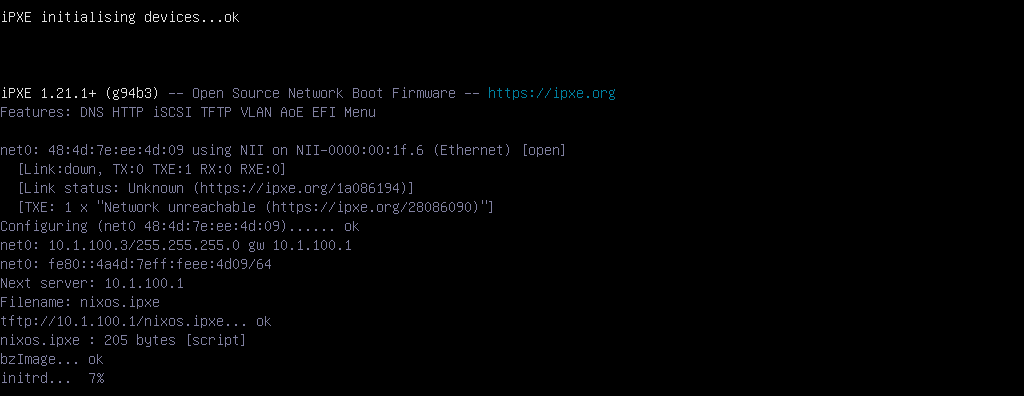
add action=memory topics=dhcpHere’s the first step of the process immediately after POST:
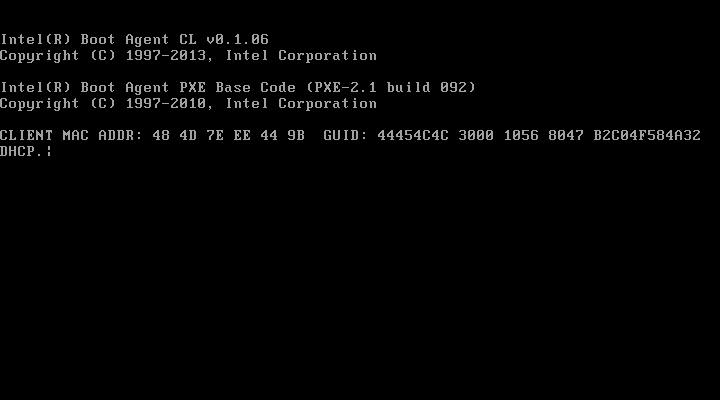

Next, iPXE NBP is downloaded via TFTP and iPXE takes over. Another DHCP dance is performed, resulting in iPXE script being downloaded via TFPT. Finally, boot files indicated in the script are downloaded by iPXE:
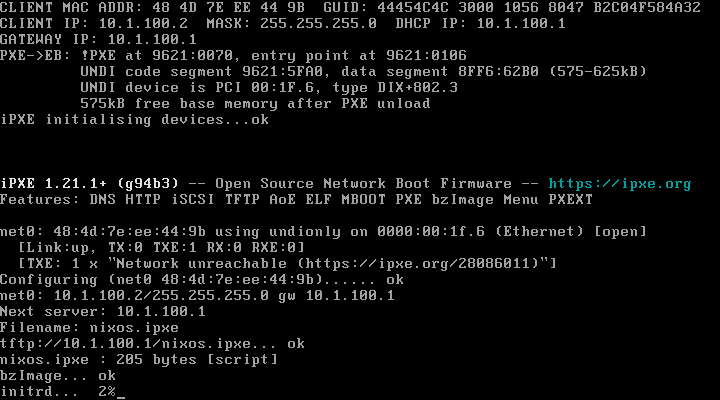
Sweet! Everything seemed to be working just fine, except it wasn’t.
Issue 1: TFTP Download Errors Out
The first issue is that downloading the initiral ramdisk errors out after some time with the following message:
initrd... Error 0x3d126001 (https://ipxe.org/3d126001)
Could not boot image: Error 0x3d126001 (https://ipxe.org/3d126001)
No more network devices.

No Boot Device Found. Press any key to reboot the machine
That’s unfortunate. This happens for both legacy and UEFI clients. The linked page isn’t particularly helpful, but it does hint the issue lies with TFTP.
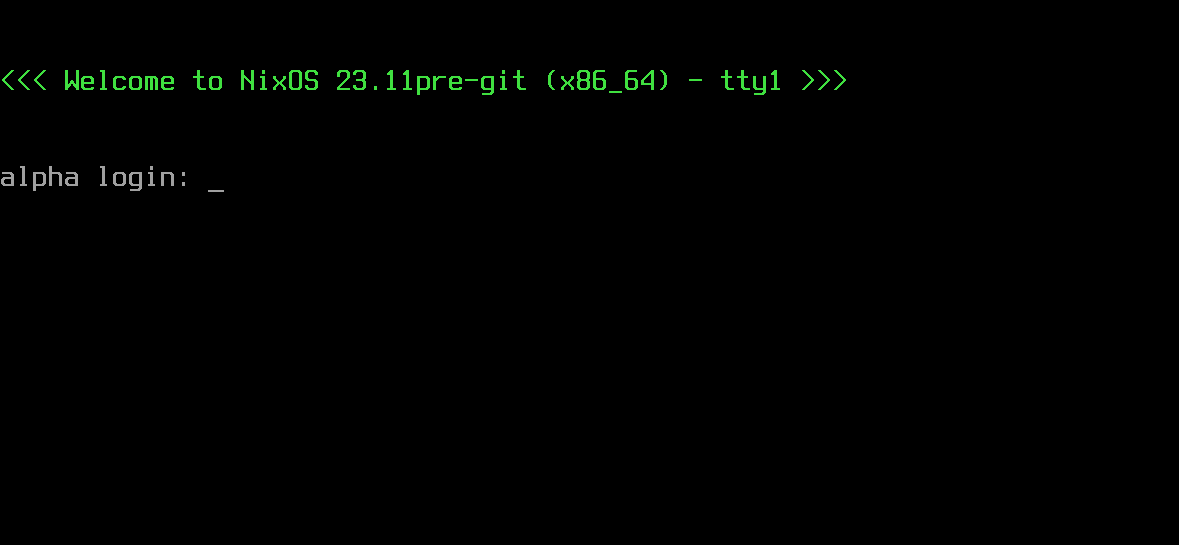
After carefully reading through MikroTik TFTP wiki page, I noticed an option called allow-rollover. Setting this to yes for the initial ramdisk TFTP entry fixes the error and allows the download to fully complete. Lo and behold, my servers are now able to boot Nix over network:
Why was I getting an error then? TFTP transfer is performed in data blocks. TFTP server sends data block messages that contain a field called Block # which is 2 bytes long, capping the maximum value at 2^16. Upon receiving the data block message, client responds with Ack message that contains Block # field set to same value, to acknowledge the data block. Server then increments Block # and sends the next data block.
With allow-rollover set to no, TFTP transfer will fail whenever this counter reaches max value, which effectively limits size of files that can be transferred via TFTP to 512 B (data block length) * 65535 (maximum Block #) = 32 MB.
Data block length is larger nowadays. For non-fragmented transfers, it is at most 1500 (my ethernet MTU) - 20 B (IP header) - 8 B (UDP header) - 4 B (TFTP) header = 1468 B which limits file size to roughly 92 MB. This is ~23% of initrd size, which is exactly the point at which TFTP download errors out. Case closed.
With that out of the way, I still had to deal with slow download speeds.
Issue 2: Download Speed
It took almost 15 minutes to boot Nix. Downloading the initial ramdisk is excruciatingly slow, and takes up the biggest chunk of boot time. I know I said earlier I don’t care about shaving seconds off boot time, but 15 minutes is just ridiculous.
What’s the bottleneck? 2.5G ethernet interface on MikroTik? 1G interface on Dell boxes? USB storage device that MikroTik is reading the file from?
I can ping the host from MikroTik to figure out average RTT:
/tool ping count=100 10.1.100.2
# (snip)
# sent=100 received=100 packet-loss=0% min-rtt=1ms58us avg-rtt=1ms902us max-rtt=21ms566us
Let’s round that up to 2 ms average RTT. This means around 1000 ms / 2 ms = 500 TFTP packets can be exchanged in 1 second – server sends data block packet, client responds with ACK packet, hence one round-trip. There’s going to be added overhead of TFTP client processing received data, and TFTP server sending the data, so 500 round trips per second is about the best I can get.
As mentioned above, 1468 bytes of data is transferred in one round trip. That’s 1468 B * 500 1/s = 0.7 MB/s or measly 0.7 MB/s * 8 = 5.6 Mbit/s. Transferring the 402 MB initrd file at this speed takes 9 minutes and 34 seconds! In ideal case10! This is also way below what 1Gbps NIC on the client can receive.
Note that MikroTik is reading the initrd file from a USB 2.0 thumb drive. I measured read speed for this specific file with dd and cold kernel caches, and I got about 33.5 MB/s. This is quite impressive for a USB 2.0 thumb stick, and is about 48x faster than the data rates I was seeing over TFTP. So definitely not the bottleneck here.
Since I was going to be doomed to ~15 minutes boot times if I kept using TFTP, I started looking at what other protocols iPXE supports for downloading boot files. HTTP seems to be a standard choice here, so that’s what I tried next.
RouterOS sadly doesn’t provide HTTP server out of the box. However, some MikroTik devices can run containers! This post is already growing far too long, so I’m going to describe how to enable this functionality, build a nginx container with Nix, deploy it and run it on MikroTik in another post. Suffice it to say, now I had a way to serve boot files via HTTP on my MikroTik device.
To have iPXE download files over HTTP, the only change I needed to make to the script was:
--- ./nixos.ipxe.tftp   2024-03-19 07:58:09.099708089 +0100
+++ ./nixos.ipxe.http   2024-03-19 07:58:56.446997779 +0100
@@ -1,5 +1,5 @@
 #!ipxe
 set initscript /nix/store/2ll6swqhsg0mpby6kbffz2s8hqar40zr-nixos-system-nixos-23.11beta-420383.gfedcba/init
-kernel bzImage init=${initscript} initrd=initrd nohibernate loglevel=4
-initrd initrd
+kernel http://10.1.100.1/nixos/bzImage init=${initscript} initrd=initrd nohibernate loglevel=4
+initrd http://10.1.100.1/nixos/initrd
 boot
Now things should be blazing fast, right? Not quite.
Download speed is capped at 10 Mbps, for some reason. Boot now takes about 5 minutes, which is already 3 times faster than before, but still kinda sucks. The speed I’m seeing is suspiciously close to old 10Base-T. Is MikroTik negotiating the wrong speed?
/interface ethernet
monitor once ether1-homelab name: ether1-homelab
status: link-ok
auto-negotiation: done
rate: 1Gbps
full-duplex: yes
tx-flow-control: no
rx-flow-control: no
supported: 10M-baseT-half,10M-baseT-full,100M-baseT-half,100M-baseT-full,1G-baseT-half,1G-baseT-full,2.5G-baseT
advertising: 10M-baseT-half,10M-baseT-full,100M-baseT-half,100M-baseT-full,1G-baseT-half,1G-baseT-full,2.5G-baseT
link-partner-advertising: 10M-baseT-half,10M-baseT-full,100M-baseT-half,100M-baseT-full,1G-baseT-full
However, on the Dell side, after booting NixOS:
[dimitrije@alpha:~]$ sudo ethtool enp0s31f6
Settings for enp0s31f6:
        Supported ports: [ TP ]
        Supported link modes:   10baseT/Half 10baseT/Full
                                100baseT/Half 100baseT/Full
                                1000baseT/Full
        Supported pause frame use: No
        Supports auto-negotiation: Yes
        Supported FEC modes: Not reported
        Advertised link modes:  10baseT/Half 10baseT/Full
                                100baseT/Half 100baseT/Full
                                1000baseT/Full
        Advertised pause frame use: No
        Advertised auto-negotiation: Yes
	Advertised FEC modes: Not reported
        Speed: 10Mb/s
        Duplex: Full
        Auto-negotiation: on
        Port: Twisted Pair
        PHYAD: 1
        Transceiver: internal
        MDI-X: on (auto)
        Supports Wake-on: pumbg
        Wake-on: g
        Current message level: 0x00000007 (7)
                               drv probe link
        Link detected: yes
Uh-oh, the client for some reason uses 10 Mbps. If I try to override the speed, I get the following error:
[dimitrije@alpha:~]$ sudo ethtool -s enp0s31f6 speed 1000 duplex full
netlink error: link settings update failed
netlink error: Invalid argument
[dimitrije@alpha:~]$ dmesg | grep e1000e | tail -1
[  157.027915] e1000e 0000:00:1f.6 enp0s31f6: Cannot change link characteristics when SoL/IDER is active.
This error message led me down a rabbit hole11, and the only workaround that sometimes works is to rmmod e1000e; modprobe e1000e; reboot. Then the issue would resolve itself, for a while at least. Annoying.
If I squint hard enough and forget this issue for a moment, what’s the end result, in cases where I can get NIC to operate at 1Gbps? The entire boot process lasts about 40 seconds, from turning on the power to login prompt. Out of that, only 20 seconds is spent on PXE/iPXE. Neat! Time lapse is below:
Closing Remarks
This post hopefully shed some light on how booting via network works. I am wrapping this up with a bitter taste in my mouth because I don’t really know why NIC sometimes locks up at 10Mbps. I should probably follow best practices and use onboard NIC as management interface only, and install a separate NIC for everything else.
Having a functional PXE environment, I can focus on crafting custom NixOS images for my Dell servers. But there are still a couple of netboot tidbits that I haven’t gone over yet. Therefore, in the next blog post, I’ll describe how to build, i.e. cross-compile, nginx web server container that can run on MikroTik router, and that I use to serve boot files over HTTP to iPXE clients. Furthermore, it will serve a different image based on MAC address, such that different hosts boot different NixOS configurations.
I also ended up using a fancier iPXE script that allows me to select boot option, including FreeDOS, which is incredibly handy for updating BIOS. I’ll showcase the script in the next post as well.
Until that time comes, take care, and have fun netbootin’!
Pronounced as pixie.↩︎
Trivial File Transfer Protocol is true to its name – very simple to implement, but also quite limited. It uses UDP for data transfer. Data is sent in 512-bytes IP packets that each have to be acknowledged before next packet is sent. Therefore, TFTP transfer speed is not great. There are a few ways around this, for example adjustable window size. But most deployments use TFTP to chainload a more capable network bootloader, that uses other transfer protocols to fetch boot images faster. TFPT is defined in RFC783 .↩︎
For gory details on how PXE boot process works, see PXE 2.1 specification from 1999 (mirrored here since Intel no longer seems to be hosting this file).↩︎
This option was introduced in RFC3004 to allow customizing DHCP offers for different classes of clients. The value is opaque, and there are no restrictions on what it may be. iPXE sets it to string
iPXE.↩︎By default, iPXE NBPs (ipxe.efi for UEFI or ipxe.pxe for BIOS) come bundled with a bunch of NIC drivers that implement the entire PXE stack. These images do not rely on existing NIC driver.
undionly.kpxe(for BIOS) andsnponly.efi(UEFI) images are lightweight alternatives that rely on existing NIC firmware for implementing the “lower part” of PXE stack, and only replace the “upper part”.↩︎A more robust alternative to this is to capture DHCP packets and inspect them. Much of what I wrote in this post was inferred from looking at packet captures in Wireshark.↩︎
In reality, looking at MikroTik transfer rates while initrd was being sent, I saw average Tx/Rx rates of around 370 packets per second and ~4 Mbit/s transfer data rates.↩︎
I tried disabling ASPM, ACPI and APM on kernel command line, to no avail. I found no helpful BIOS settings related to the onboard NIC. I found a post on OpenWRT forums that describes the exact same issue, and links to this Launchpad bug, but none of suggested workarounds worked in my case. I have a strong feeling this is, as the person in the OpenWRT post suggested, linked to Intel AMT, which keeps the NIC on all the time.↩︎